

How To Create Your Own Custom Wordpress Theme
Are you planning to create your own theme? In this post, we share exactly how to make a WordPress theme.
WordPress is a popular open-source content management system (CMS) that is used all over the world. With the aid of the powerful WordPress website builder software, you can also use this platform to easily construct a strong online presence and develop your business online. WordPress is a no-brainer and the easiest to get started with. And it is for this reason that every developer advises you to use it as the foundation of your website.
The only way to truly grasp how WordPress Themes operate is to get in head first and do everything yourself. Yes, it's tempting to avoid this because WordPress can handle everything for you if you don't know how to code. By the end of this tutorial, you'll learn how to make a WordPress theme, have a better grasp of how everything fits together, and how to use WordPress at your leisure.
What is a WordPress theme, exactly?
A WordPress theme is a collection of files (graphics, style sheets, and code) that determines how your blog or website looks. Themes may govern anything from your site's style to the colors of its hyperlinks. It's easy to think of a theme as a "skin" for your website, but they're so much more.
A theme allows you to manage the appearance of your blog rather than just giving it a look and feel.
WordPress comes with its own set of themes. In reality, the platform comes with a variety of pre-installed themes. There are a few reasons, though, why you might wish to select and install a new theme on your website:
To enhance the aesthetic attractiveness of your website. You can select an appropriate theme and adjust it to fulfill your requirements if you have a special vision for your site.
To provide for additional design flexibility. Many themes provide a plethora of adjustments to assist you to build the perfect design if you have no design or coding knowledge. A theme may feature features pertaining to your niche that you won't find anywhere else, depending on your demands.
While the basic or modified version of a theme can serve for a wide range of websites, there are hundreds of themes to pick from, each addressing a unique niche or purpose.
So, why create your own WordPress theme?
The choice of a theme is one of the most significant aspects of creating or maintaining a WordPress site. Usually, you have a number of alternatives to pick from. You may pick a certain theme foundation and then a theme built on top of that framework, depending on your needs.

Article Continues Below
Most consumers go through hundreds of themes, both free and paid, before selecting one that appeals to them and closely reflects what they desire. Most of them come with modification options to change them to some level out of the box, but the general appearance and feel remain the same.
The best choice, though, is to start from scratch and design a bespoke theme. Obviously, this necessitates some technical knowledge as well as the ability to design a website. Once you've found a design that works for you, a custom theme is the best way to put it into action.
In comparison to utilizing a third-party theme or a child theme, creating a custom theme offers a number of advantages.
- Individuality: You have created a theme that is unique to your website. It implies that your website is the only one that uses it, and it differs from the tens of thousands of others that use the same theme but with a different color scheme.
- Improved Safety: The custom theme is less likely to have serious security problems because you're using fewer features and less code. Even if it's probably difficult to be certain about bugs, you're not waiting on a third-party vendor to release a security or bug fix. You can take care of them when you come across them.
- There isn't any feature overload: Custom themes do not require a slew of functionality that you will never use or require. All of these undesirable features add a significant amount of executable code to your website, potentially slowing it down.
- Use of Plugins Should Be Limited: This is especially true of the plugins you employ to alter and arrange your material. This can reduce the theme's dependency on third-party plugins while simultaneously speeding it up by eliminating the need to inject plugin code at runtime. However, depending on the functionality that it provides, not all plugins can be incorporated.
- Static files of a small size: This minimizes the total page size and ensures that no more CSS rules or JavaScript code is sent and served than is necessary. Because every piece of content is already adapted for your design in a custom theme, you don't need a lot of code to make it adjustable. All of this modification code might make your website heavier and slower, especially if done incorrectly.
- Search Engine Optimization (SEO): is a term that refers to the process of optimizing a website. A custom theme is generally very light on source code, with nearly no new code. The lean code, which makes the websites incredibly light, is the major SEO benefit here. There are various frameworks and themes dedicated to speed that are always an option, but a custom theme is always the best solution.
What are the prerequisites for developing a WordPress theme?
You need a website to get started. Any site will suffice. You don't need to know any PHP or have any prior WordPress knowledge. But a development environment with Apache, PHP, MySQL, and WordPress installed is required to design a WordPress theme. You can get WordPress from the official website, but you'll need to change the database credentials first.
You must also understand the theme's structure. In its simplest form, a WordPress theme is a regular HTML page that is made up of the following files:
- header.php – a file that stores the header code.
- footer.php – holds the code for the footer;
- sidebar.php – where you set up the buttons on the side of the page;
- style.css – manages the theme's aesthetic appearance;
- index.php – The settings provided on the main page are included here.
- single.php – includes code for displaying the article on its own page;
- page.php – includes code for displaying a single page's content;
- archive.php – displays a list of items in the archive, as well as the categories that the user has defined;
- functions.php – This file contains functions that enhance theme functionality, such as logos, menus, color, thumbnails, scripts, and stylesheets.
- 404.php – an error code indicating that the requested file could not be found.
In order to personalize your template, you'll also need to incorporate certain Bootstrap settings. We'll walk you through the first steps of this customization in this post. See the list below.
Step 1: Make a folder to hold the files you'll be adding
We need to know where the files that make up a WordPress theme sit in a WordPress installation if we're going to construct themes. This is a simple task. We know that a WordPress installation usually contains a WordPress directory as its root directory. Here is how our root directory appears.
Files:
- composer.json
- index.php
- license.txt
- readme.html
- wp-activate.php
- wp-blog-header.php
- wp-comments-post.php
- wp-config.php
- wp-config-sample.php
- wp-cron.php
- wp-links-opml.php
- wp-load.php
- wp-login.php
- wp-mail.php
- wp-settings.php
- wp-signup.php
- wp-trackback.php
- xmlrpc.php
Folders
- wp-admin
- wp-content
- wp-includes
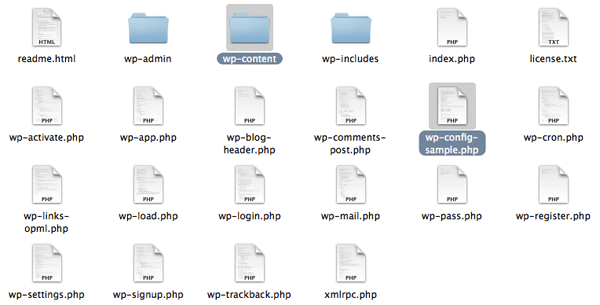
Themes is a folder within the wp-content folder. The location of your new theme in the "themes" folder, will be feasible to activate and use online. It's also the folder in which you'll find one or more themes to utilize with your WordPress website.
Article Continues Below

Step 2: Create the index.php and style.css files
You must additionally create two necessary files index.php and style.css when you finish constructing your theme folder.
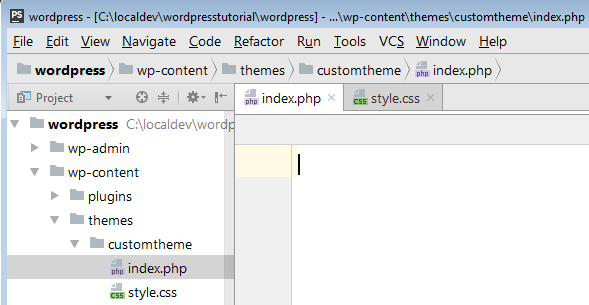
- style.css
Only the Theme Name is required in style.css so that WordPress can locate and list your theme so that you may activate it.
- /*
- Theme Name: customtheme
- Author: WPlift
- Author URI: https://wplift.com
- Version: 1.0
- */
We just assign a Theme Name, Author, Author URI, and Version number to our theme in the example. But if you want a more decent theme you can include this info below:
Theme Name – A theme name should always be provided. If you don't, the folder name will be used, which in this case is my-custom-theme.
Theme URI – it should direct users to a website where they may learn more about the theme.
Author – This is where you put your name.
Author URI – Here you may add a link to your personal or business website.
Description – is displayed in both the wp-admin theme modal and the WordPress theme listing.
Version – Version numbers help developers keep track of changes and ensure that customers are using the most up-to-date version. To indicate the severity of changes in an update, we use the SemVer numbering system.
License – You may choose how your theme is licensed, but if it isn't GPL-compatible, you won't be able to distribute it on WordPress.
Article Continues Below

License URI – just a link.
Text Domain – The text-domain is utilized when translating your theme into other languages. Don't worry, we'll get into more information about this later. For now, knowing that the theme folder and text-domain should be the theme name separated by hyphens rather than spaces is sufficient.
Tags – Only when uploading a theme to the WordPress.org theme directory are these variables utilized. The 'Feature Filter' process is built around them.
Although none of the fields are technically essential, they are strongly recommended if you want your theme to appear decent in wp-admin. They're also essential if you're going to use WordPress to distribute your theme.
- index.php
WP loads the posts that will be shown on the screen using this file. In addition, if a WP base file is missing, wp will use it.
- <h1>Custom Theme!</h1>
Step 3: In the WordPress dashboard, activate the theme
Go to the WordPress Dashboard, choose "Appearance," then "Themes," and see if the newly built theme is shown among the possibilities.
To check if the information entered in the style is correct, go to "Theme Details."
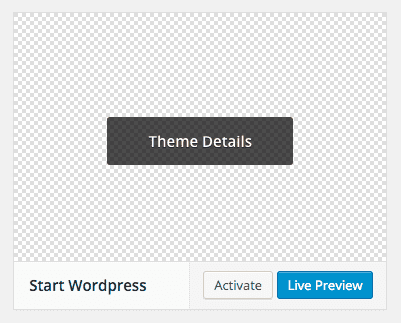
The CSS file is right.
On WordPress, go to the Themes page and manage your themes.
Click " Activate" to activate your new them in WP, then see if the website whether the changes have been applied.
Step 4: Change the settings in the index.php file
To test if your theme works, return to the index.php command line and erase the content you just typed.
After, create a command line for WP in order to retrieve from the database the posts and show them on the page. You must restore the post's title and content so that all of the files can be seen on the home page.
The "have posts" command instructs WP to look for blog posts in the database. The page will be updated if there are any new listings. If not, the message for the negative response condition that we set in the code will be shown (false).
There is a function named "the post" that must be added to the while doing loop "have posts" in order for WP to show that file whenever the "have posts" condition is true. WordPress looks for new entries in this loop and shows them on the page as needed.
In reality, if the database includes posts, all actions within the loop will be executed for all post files identified while they are being discovered. Otherwise, WP will inform the user that there are no posts accessible. Look at the code below:
<?php if ( have_posts() ) : while ( have_posts() ) : the_post(); ?> <h2><a href="<?php the_permalink() ?>"><?php the_title() ?></a></h2> <?php the_content() ?> <?php endwhile; else : echo '<p>There are no posts!</p>'; endif; ?> In this loop, two functions, "have posts" and "the post," are utilized in their most basic form. If any postings in the database need to be repeated, use the "have posts" method. True or false will be returned by this function, with true signifying that there are posts to display. There are none if it returns false.
The "the post" method fetches the most recent post and makes the required adjustments to show it chronologically on the theme page. Because this is a loop, if the function returns true, every time a new post is made, it will be instantly appended.
The content is attached to the file title put on the page using the "the content" function. The "the permalink" function creates a link to each individual post, allowing users to view the information without having to scroll through the entire text on the main page.
Simply use the "the excerpt" method instead of the "the content" method to add a quick summary under the file title with the first 200 characters of the content. As a result, when the user clicks on the link, they only get the whole text.
In this instance, you'll need to create a new file in your theme's folder that looks similar to "index.php" (simply copy and paste the index.php loop and replace the "the excerpt" function with "the content").
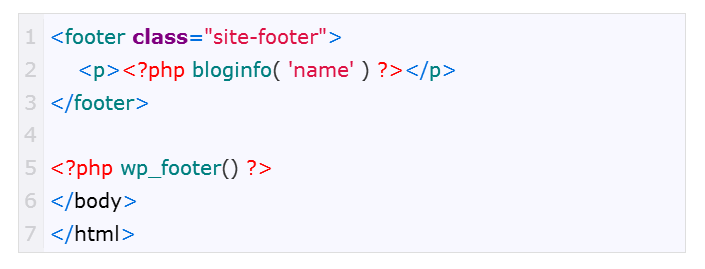
Create new files in the same folder as your theme like the following step, where style.css and index.php are already present. Header.php and footer.php are their names.
It's best to include wp head in all of your themes since it's a specific function that wraps up the output in the header.php file's head> section. It should be placed before the closing /head> tag to make it easier to add plugins to the site, since this hook may be used to add styles, scripts, or meta components to the head> region.
- Footer
The footer.php file can close the tags used in the functions, as described below:
Step 6: Create the functions.php folder
At this stage, the custom theme has four file folders: index.php, style.css, header.php, and footer.php. The next file you should write is functions.php, which gives WordPress personality by allowing the command-line to change the CMS's default behavior. The following are its characteristics:
- does not require a unique header text; only works when the theme is active;
- applies only to the current theme;
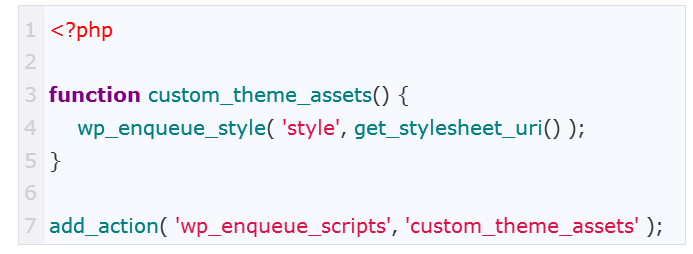
This code will include or activate the stylesheet for your custom theme:
Wrapping It Up
It's finished! Your theme was constructed and the links that send the visitor to an exclusive page for each article operate well. In addition, you've already included your custom theme's header, footer, and CSS.
You learned the fundamentals of creating a WordPress theme in this lesson. Because website appearance is vital, especially for business applications, you may use Bootstrap to add lines of ready-made template scripts to your page, making it easier to add new features and functionality. Let us know how you get on with this one!

How To Create Your Own Custom Wordpress Theme
Source: https://wplift.com/how-to-make-a-wordpress-theme
Posted by: fitzgeraldforeas.blogspot.com
0 Response to "How To Create Your Own Custom Wordpress Theme"
Post a Comment